Unreal Engine Enhanced Input
Table of Contents
Introduction
In this post I'll take a look at implementing first-person player movement in Unreal Engine 5 leveraging Enhanced Input, using a combination of C++ and Blueprints.
This post is the first in my series of documenting what I learn while creating a hotdog truck simulator game in Unreal Engine 5.
Creating a player character class
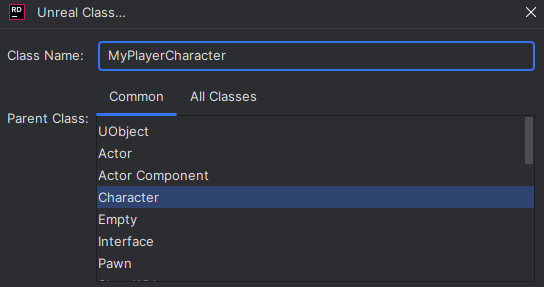
I will be using JetBrains Rider as my IDE for this guide. I start by creating a new C++ class for the player character with a parent class of ACharacter.
Why inherit from ACharacter?
Inheriting from ACharacter is beneficial as we get built-in functionality such as a movement component, capsule collision component, and an input setup function SetupPlayerInputComponent in C++ to handle player input.
Inputs & Mapping Contexts
Before we add any logic to this new C++ class, we need to set up our inputs and mapping contexts in engine.
Input Actions & Mapping Contexts
Input Actions are used to define specific actions that can be triggered.
Mapping Contexts can group these input actions and can be added or removed from our player controller to change what inputs are active, allowing for different control schemes in different situations.
As seen below, I created two new input actions - one to handle our mouse input (looking), and another to handle movement (moving). These input actions are grouped into the "Player" mapping context. 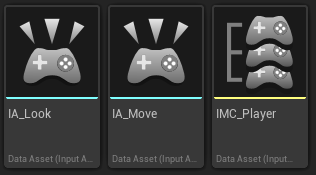
Two directional input can be set up using the below input modifiers in the mapping context. More information about directional input can be found in the Unreal Engine documentation.
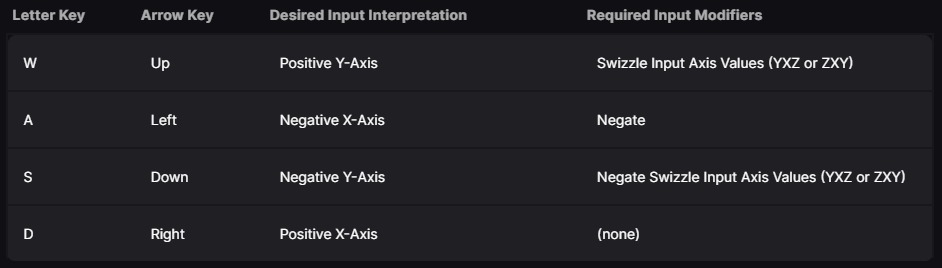
In the mapping context, I added the two input actions, and configured the input bindings for each action. the move action is bound to the WASD keys following the directional input setup above, and the look action is bound to the mouse XY 2D input. 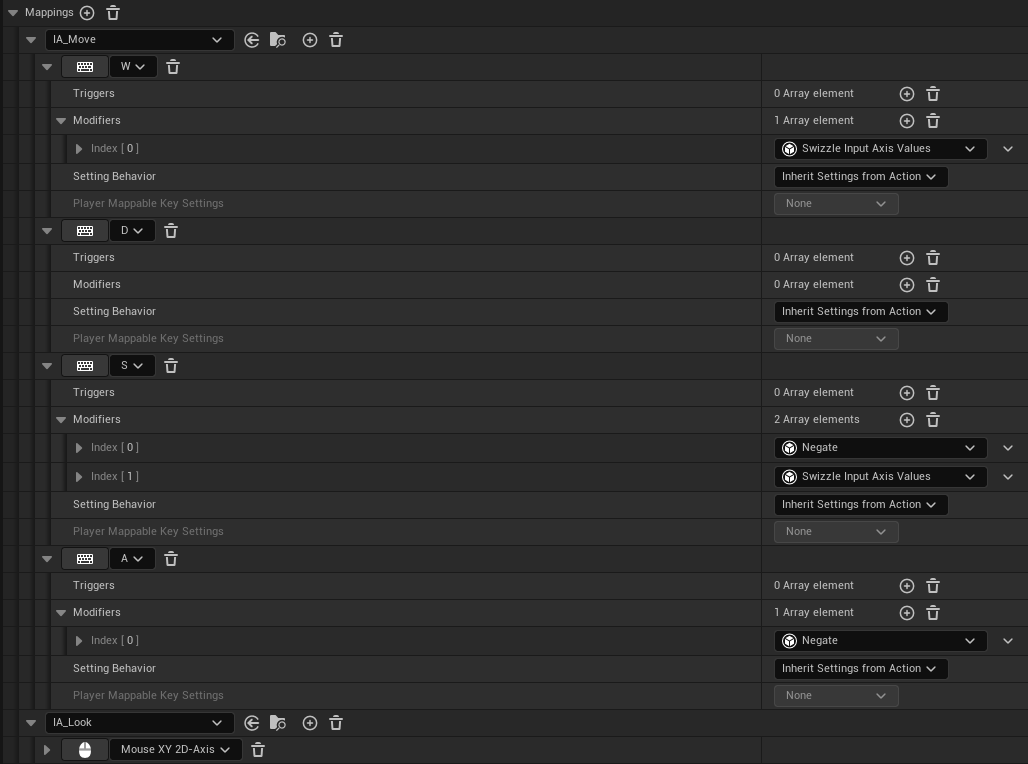
We also need to make sure that we invert the Y axis for the look action by using the negate modifier. 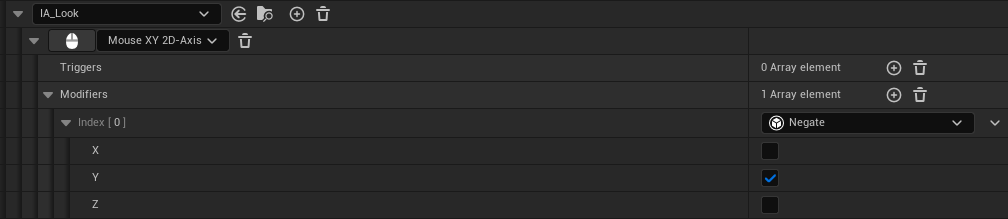
Setting up the player character & Input Mapping Contexts
The first thing we want to do is set up our input mapping context. We can start by creating a new property in our player character header file to hold a reference to our mapping context.
UPROPERTY
The UPROPERTY macro is used to expose this property in the details panel of our player character Blueprint. This will allow us to change the mapping context in the editor, and this also ensures that our logic is designer friendly, as designers can change the value without needing to modify any code.
You can learn more about UPROPERTY specifiers in the Unreal Engine documentation.
TObjectPtr<T>
TObjectPtr<T> is a smart pointer designer to replace raw pointers (like T*) for UPROPERTY member variables. It offers benefits like:
- Lazy Loading: When objects are accessed via
TObjectPtr, they are only loaded at that moment, which can improve performance and startup times. - Access Tracking:
TObjectPtrsupports access tracking - allowing the engine to monitor when and how the object is accessed. - Garbage Collection:
TObjectPtrhelps the engine's garbage collector to more accurately track and manage object lifetimes.
You can learn more about object pointers in the Unreal Engine documentation.
UPROPERTY(EditAnywhere, BlueprintReadOnly, Category = PlayerCharacter)
TObjectPtr<UInputMappingContext> IMCDefault;
With the property now created, we can make a blueprint based on our C++ class, and set the exposed property to the mapping context we created earlier. 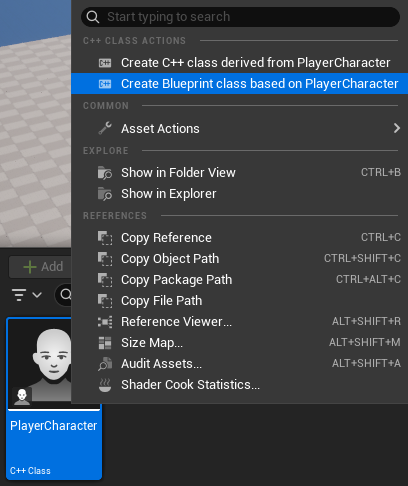

With the mapping context set, we can now add the mapping context to our player controller. This will be done in the SetupInputComponent function, which is called when the player controller is created.
void AMyPlayerCharacter::SetupPlayerInputComponent(UInputComponent* PlayerInputComponent)
{
 Super::SetupPlayerInputComponent(PlayerInputComponent);

 // Get the player controller that is possessing this character
 APlayerController* playerController = Cast<APlayerController>(Controller);
 if (!playerController)
  return;

 // Get the local player from the player controller
 ULocalPlayer* localPlayer = playerController->GetLocalPlayer();
 if (!localPlayer)
  return;

 // Get the enhanced input subsystem from the local player
 UEnhancedInputLocalPlayerSubsystem* inputSubsystem = localPlayer->GetSubsystem<UEnhancedInputLocalPlayerSubsystem>();
 if (!inputSubsystem)
  return;

 // Add the mapping context to the input subsystem
 inputSubsystem->AddMappingContext(IMCDefault, 0);
}
Attaching the player character logic to the input actions
There are a few ways of attaching the input actions to our player character class.
We could go for a hybrid approach, where the input actions are bound in Blueprints to functions that are defined in C++.
View the C++ & Blueprint Hybrid Approach
For the hybrid approach, we can start by defining some functions in our header file. These functions are marked with the UFUNCTION macro, which allows us to expose them to Blueprints.
UFUNCTION(BlueprintNativeEvent, BlueprintCallable)
void DoMove(FVector2D Input);

UFUNCTION(BlueprintNativeEvent, BlueprintCallable)
void DoLook(FVector2D Input);
UFUNCTION
When using UFUNCTION with BlueprintNativeEvent, we need to provide an implementation for the function in C++. This is done in the C++ source file, where we define the function with the same name, but with _Implementation suffixed.
Why?
When we specify BlueprintNativeEvent in a UFUNCTION in a header file, the Unreal Header Tool (UHT) generates boilerplate code in a hidden generated header file (<class>.generated.h). This includes a declaration for the function that Blueprints can override, as well as a corresponding _Implementation function that serves as the default C++ implementation, which must be defined in the C++ source file for default behaviour.
If an override in Blueprints exists, the Blueprint version will be called, otherwise the C++ _Implementation version will be executed.
We can then move on to the implementations for these functions in the C++ source file.
void AMyPlayerCharacter::DoLook_Implementation(FVector2D input)
{
 AddControllerPitchInput(input.Y);
 AddControllerYawInput(input.X);
}

void AMyPlayerCharacter::DoMove_Implementation(FVector2D input)
{
 AddMovementInput(GetActorForwardVector(), input.Y);
 AddMovementInput(GetActorRightVector(), input.X);
}
These C++ functions can then be connected to our input actions via Blueprints in the player character blueprint class, as seen below. 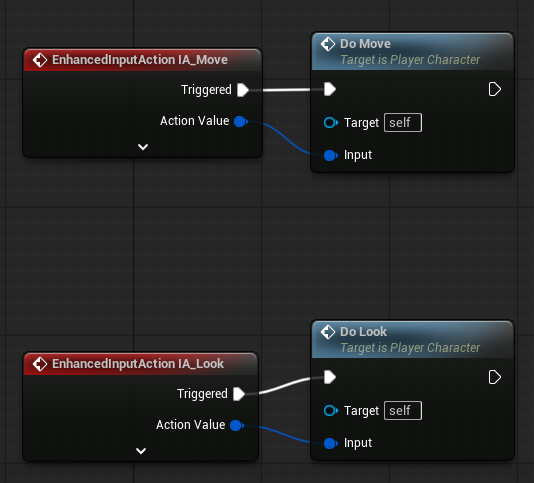
Pros & Cons of the Hybrid Approach
Pros:
- Logic for movement and looking is in C++, which is easier to manage and version control.
- The connection for input actions to functions is done in Blueprints, which is more designer friendly.
- The functions can still be overridden in Blueprints, allowing for easy prototyping and iteration from designers.
Cons:
- Blueprints are still involved, which can be difficult to manage with version control like Git as they are binary files.
- More steps are involved to set up the input actions, as they have to be connected in Blueprints.
- Slightly less performant than a fully C++ approach as Blueprints have some overhead.
Or we can go for a fully C++ approach, where the input actions are bound in C++.
View the C++ Approach
For the fully C++ approach, we need to start by creating properties in our header file to hold references to our input actions. These variables will use the UPROPERTY macro as earlier to expose them in the details of our player character Blueprint, as well as using TObjectPtr for the smart pointer benefits mentioned earlier.
UPROPERTY(EditAnywhere, BlueprintReadOnly, Category = PlayerCharacter)
TObjectPtr<UInputAction> IAMove;

UPROPERTY(EditAnywhere, BlueprintReadOnly, Category = PlayerCharacter)
TObjectPtr<UInputAction> IALook;
Again, we will need to set these properties in the player character Blueprint, as seen below. 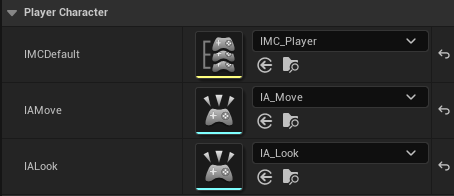
Before we bind the actions in C++, we need to define the functions for the actions in our header file.
FInputActionInstance
These implementations take a single parameter of type FInputActionInstance, which contains all the information about the input action that was triggered. We can use this input action instance to get the input value, which is then used to add move or look input to the player character.
UFUNCTION()
void DoMove(const FInputActionInstance& Instance);

UFUNCTION()
void DoLook(const FInputActionInstance& Instance);
We can then move on to the implementations for these functions in the C++ source file.
void AMyPlayerCharacter::DoMove(const FInputActionInstance& instance)
{
 FVector2D input = instance.GetValue().Get<FVector2D>();

 AddMovementInput(GetActorForwardVector(), input.Y);
 AddMovementInput(GetActorRightVector(), input.X);
}
void AMyPlayerCharacter::DoLook(const FInputActionInstance& instance)
{
 FVector2D input = instance.GetValue().Get<FVector2D>();

 AddControllerPitchInput(input.Y);
 AddControllerYawInput(input.X);
}
With the functions defined, we can now bind the input actions to these functions at the end of the SetupInputComponent function.
// Get the enhanced input component
UEnhancedInputComponent* enhancedInputComponent = Cast<UEnhancedInputComponent>(PlayerInputComponent);
if (!enhancedInputComponent)
 return;

// Add the input actions
if (IAMove)
 enhancedInputComponent->BindAction(IAMove, ETriggerEvent::Triggered, this, &AMyPlayerCharacter::DoMove);

if (IALook)
 enhancedInputComponent->BindAction(IALook, ETriggerEvent::Triggered, this, &AMyPlayerCharacter::DoLook);
Pros & Cons of the C++ Approach
Pros:
- All of the logic is in C++, which is easier to use with version control like Git, as Blueprints can be difficult with version control due to them being binary files.
- More performant than the hybrid approach as there is no overhead from Blueprints, which is important for frequently called functions like movement and look input.
- Everything is done in C++, meaning there is no back and forth switching between C++ and Blueprints.
Cons:
- Functions cannot be overridden in Blueprints, meaning that designers can't easily prototype and iterate the movement and look logic.
Taking this further
This guide shows how to add mapping contexts and bind input actions, but you could explore removing and adding different mapping contexts to change control schemes in different situations.
You can take this guide further by adding new input actions for more movement types, such as jumping, sprinting, etc.
My Reflection
Writing this guide was a great way to learn more about Enhanced Input with Unreal Engine 5, and I learned a lot about how to set up input actions and mapping contexts effectively in both C++ and Blueprints. I learned about the different ways C++ logic can be connection to input actions, and also about the pros and cons of each approach.
I learned a lot about the UPROPERTY and UFUNCTION macros, and how they can be used to expose properties and functions to Blueprints, and the importance of keeping my systems designer friendly through exposed properties, and this is something that I will keep in mind as I develop with C++ going forward.
I will in the future be exploring the Enhanced Input system more to switch between different control schemes in different situations, and may look at implementing more complex movement like sprinting or crouching.